
High Altitude Sourdough Bread – High Hydration Recipe
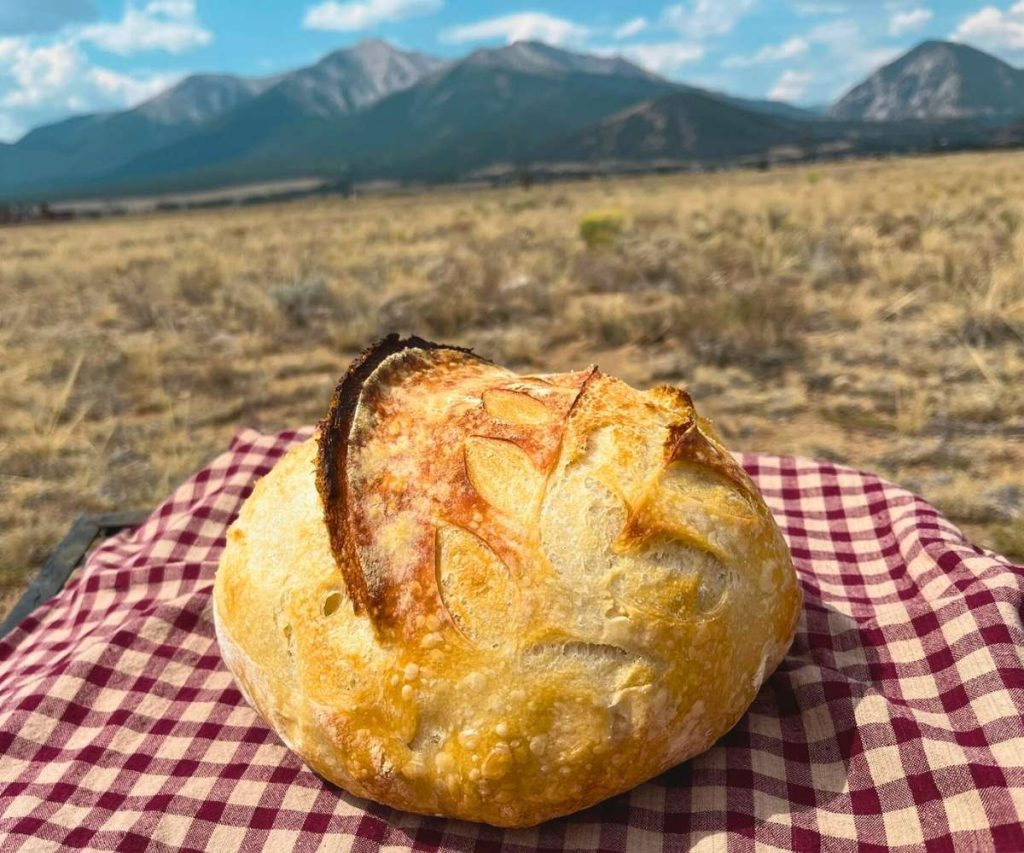
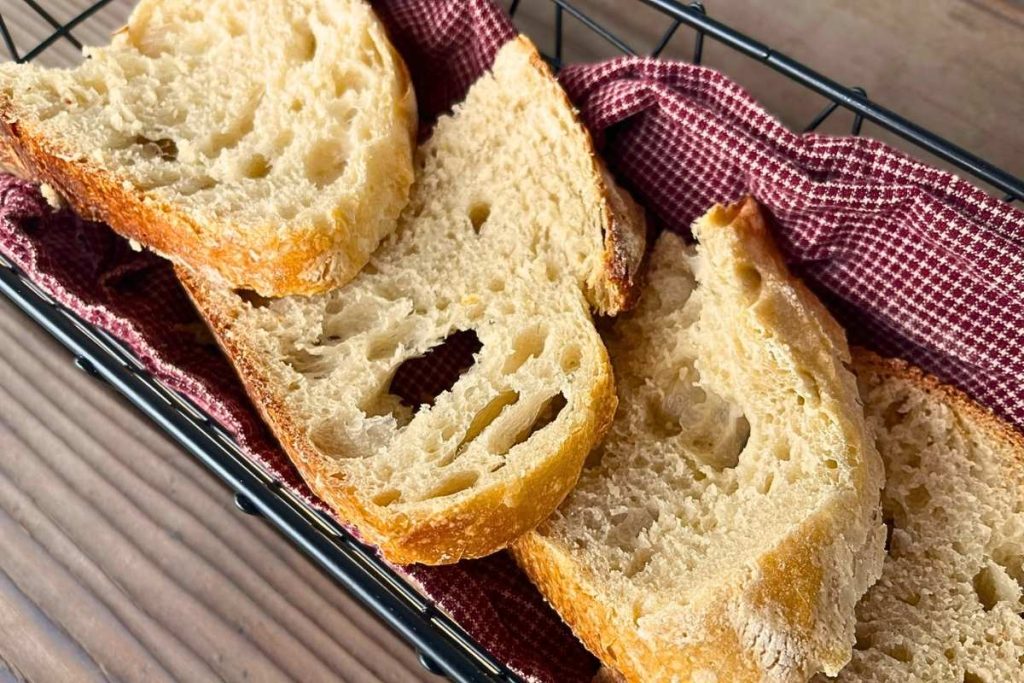
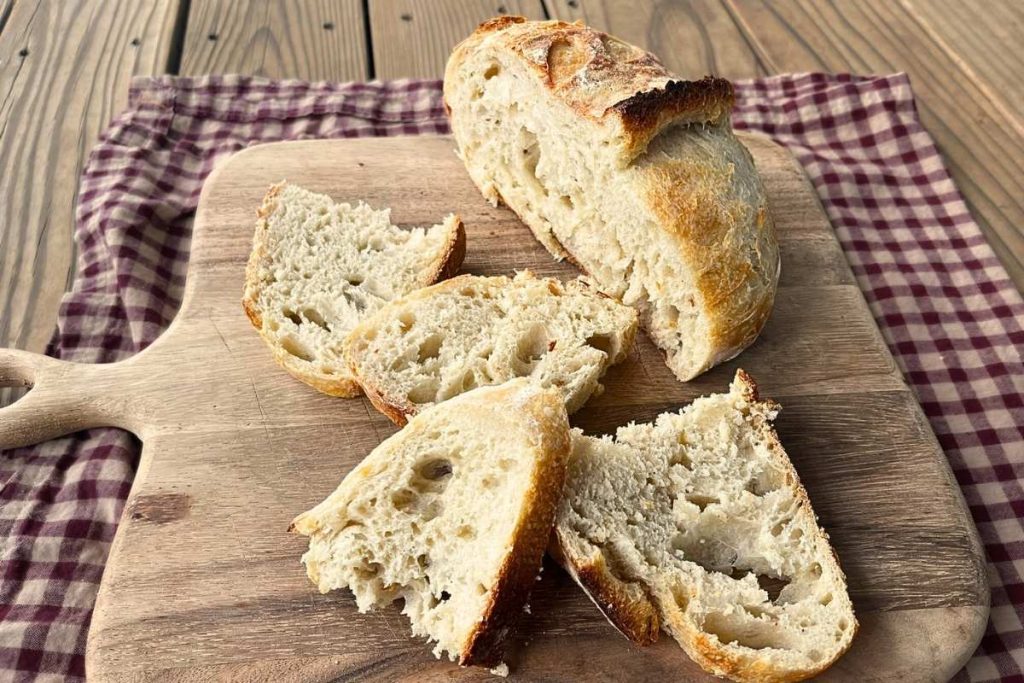
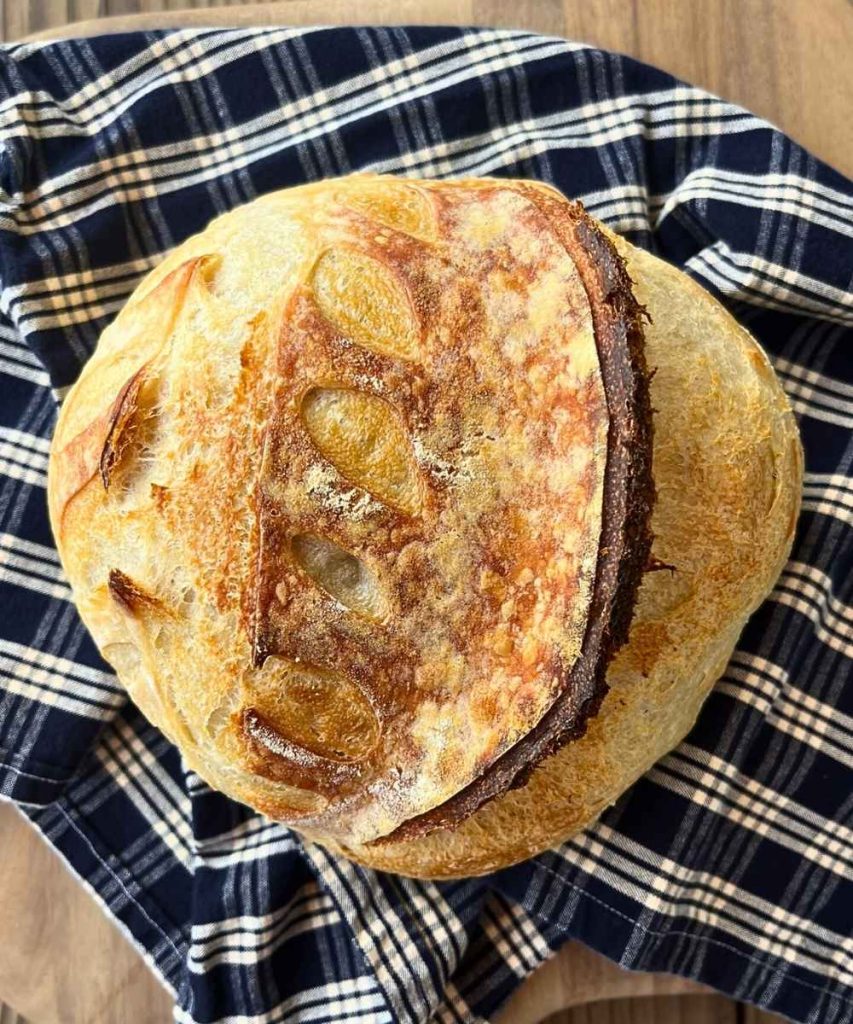
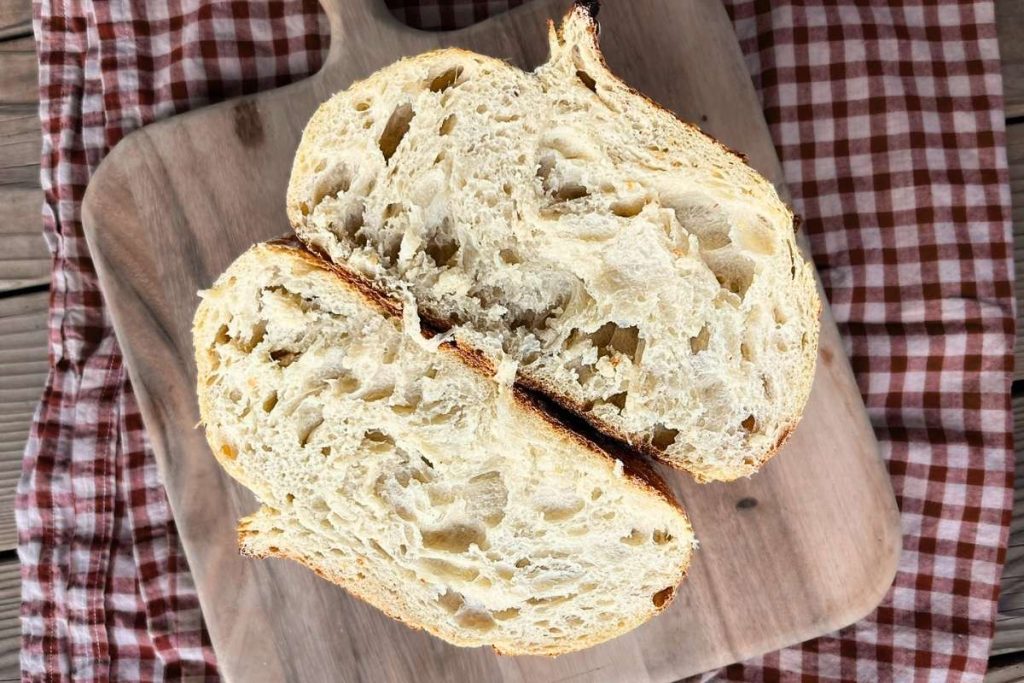
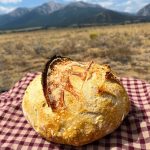
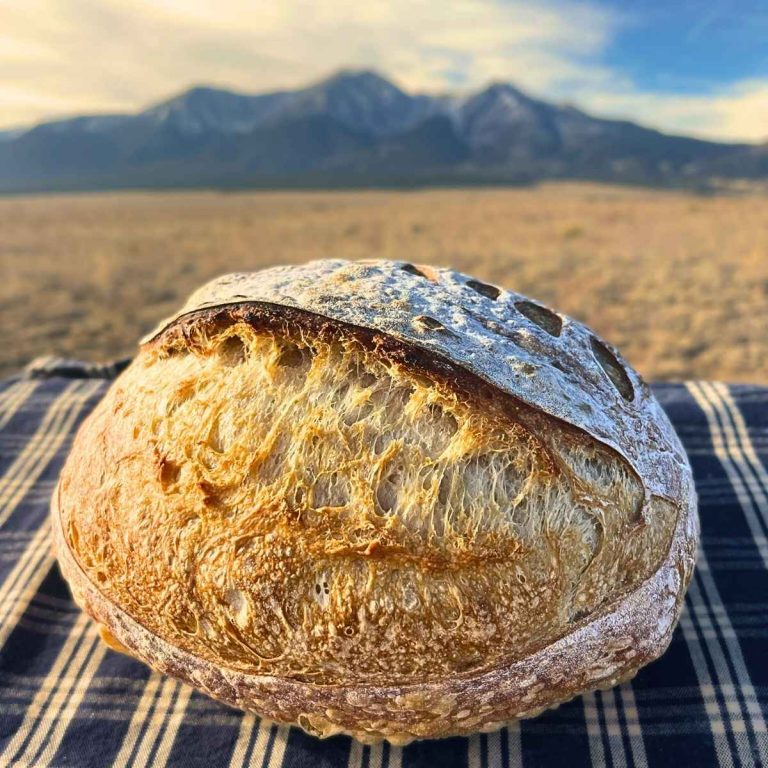
There’s nothing quite like pulling a perfect loaf of sourdough bread from the oven—crackly crust, airy crumb, and that irresistible tang. This high altitude sourdough bread is especially rewarding, with its open texture and chewy bite that makes every slice feel like bakery-style bread.
At higher altitudes, sourdough can be tricky, but with the right adjustments, you can achieve a beautifully risen loaf with a moist interior and golden crust. This recipe is my go-to for a rustic, artisan-style sourdough that’s perfect for everything from morning toast to hearty sandwiches.
Interest in other HIGH ALTITUDE BREAD RECIPES? Try out this soft & fluffy SANDWICH BREAD, 1.5 hour NO-KNEAD ARTISAN BREAD, perfectly flaky BISCUITS, easy to make DINNER ROLLS, or the best CINNAMON ROLLS with an overnight option. Check out all the BREAD RECIPES.
This High Altitude Sourdough Bread recipe is made at 8,000 ft elevation. To adjust the recipe for other elevations check out high altitude baking adjustments.
Why You’ll Love This Recipe:
- PERFECT FOR HIGH ALTITUDE – specifically tested at 8,000 ft so you don’t have to guess or troubleshoot
- ARTISAN-STYLE AT HOME – crusty on the outside with a soft, airy crumb inside
- SIMPLE INGREDIENTS – just flour, water, salt, and starter – no fancy add-ins required
- BEGINNER-FRIENDLY METHOD – step-by-step instructions with tips for shaping and proofing
- VERSATILE LOAF – delicious for toast, sandwiches, or served with soup
How do you make Sourdough at high altitude?
High altitude baking, including sourdough, requires a few adjustments due to the lower air pressure and drier air. Typically baking at higher elevations require reduced fermentation time, increase hydration, and increase oven temp or increased baking time.
If I could give you one piece of advice it would be JUST START. I’ll admit, I was hesitant to learn how to make sourdough at high altitude, it felt like something only expert bakers could pull off. But the truth is, sourdough is a lot easier than people make it out to be
My friend Ashleigh kept reminding me, “If Ma Ingalls could make it on the Oregon Trail, you can do it too,” and she was right. Sourdough doesn’t have to be intimidating—it’s simple, forgiving, and one of the most rewarding breads you’ll ever bake.
Recommended Tools:
You don’t need fancy or expensive tools to make sourdough bread. While tools like a Dutch oven, banneton, or bread lame can make the process easier, they’re not required. Sourdough has been made for centuries with the simplest equipment.
- LARGE MIXING BOWL
- MEASURING TOOLS – my suggestion would be to use a digital scale but measuring cups will also work
- PROOFING CONTAINER – a 9″ bowl with a tea towel or a banneton basket
- DUTCH OVEN – I have this to be the best option for baking this sourdough loaf
- SHARP KNIFE – a knife, scissors, or razor blade (bread lame) will all work
- PARCHMENT PAPER
- COVER FOR PROOFING CONTAINER – a damp tea towel or food grade plastic cover will work

Ingredients:
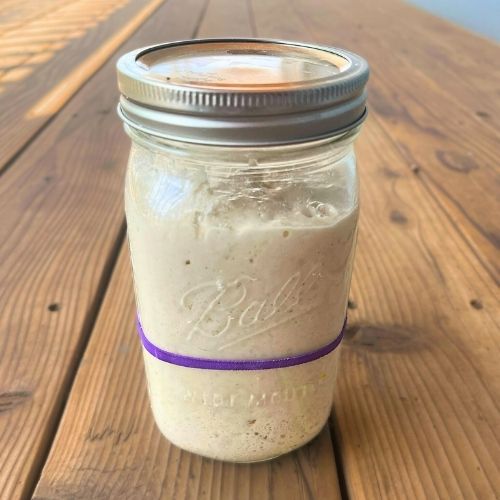
- ACTIVE STARTER – An active sourdough starter is a mixture of flour and water that’s alive with wild yeast and bacteria, bubbling with activity and ready to leaven bread
- BREAD FLOUR – Bread flour is often the best choice for sourdough bread because it has a higher protein content (at least 12%) than all-purpose flour. The extra protein develops into more gluten, which gives the dough better structure and elasticity
- WARM WATER – the water should be around 100-110° F. NOTE: if you have treated tap water filtered water would be beneficial to use, otherwise your water can weaken or kill off the natural yeast in the starter
- KOSHER SALT – kosher salt has a slightly milder and more pure taste compared to table salt
TIP: the most accurate way to measure flour is by weighing it. If you plan on measuring the flour never scoop it up, always spoon it into the measuring cup and level it off
How To Make High Altitude Sourdough Bread:
- MIX STARTER & WATER
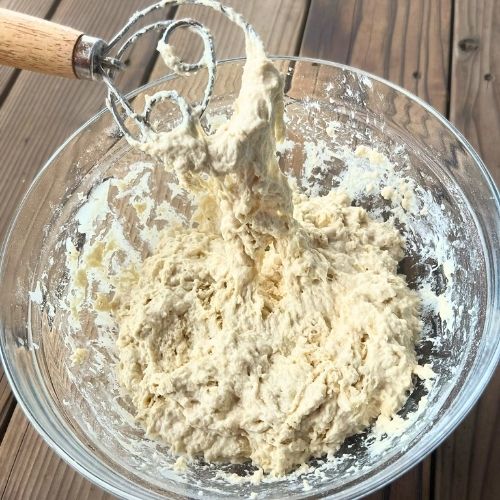
- ADD FLOUR & SALT– initially the dough will be very dry, keep mixing. The dough will eventually become wet and shaggy
- REST FOR 45 MINUTES – make sure to cover with a moist towel
- GRAB & STRETCH – you will repeat this process 4 times with a 30 minute rest in between
- REST UNTIL DOUBLE IN SIZE
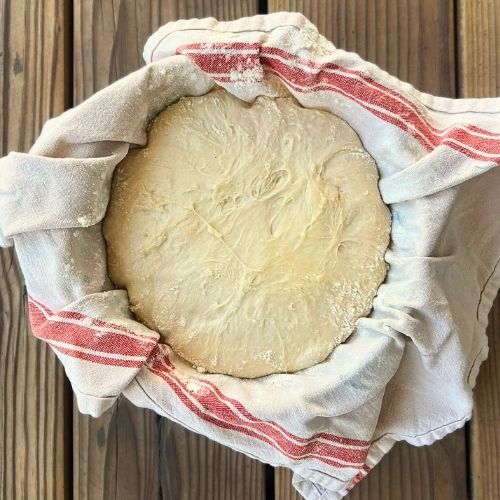
- SHAPE AND PLACE IN FRIDGE OVERNIGHT – lightly flour your banneton basket or tea towel. Make sure to cover the dough with a moist towel overnight
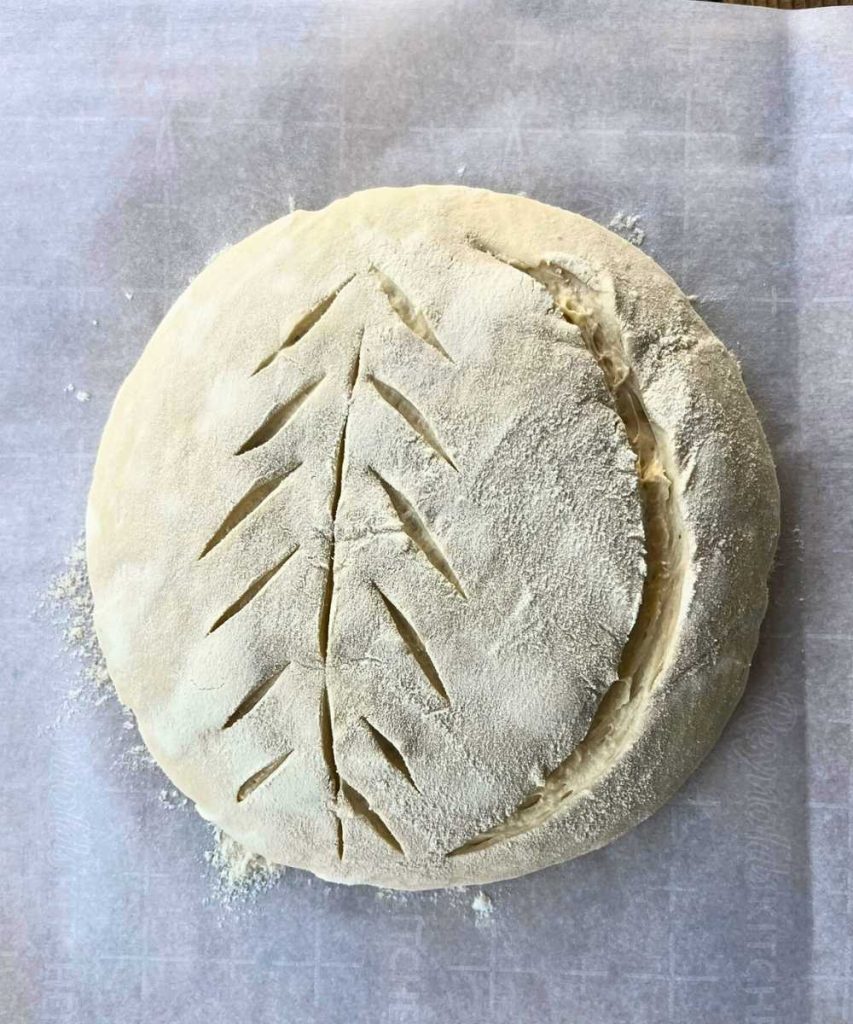
- FLOUR & SCORE – one simple, deep cut across the dough is enough but feel free to get creative as you want
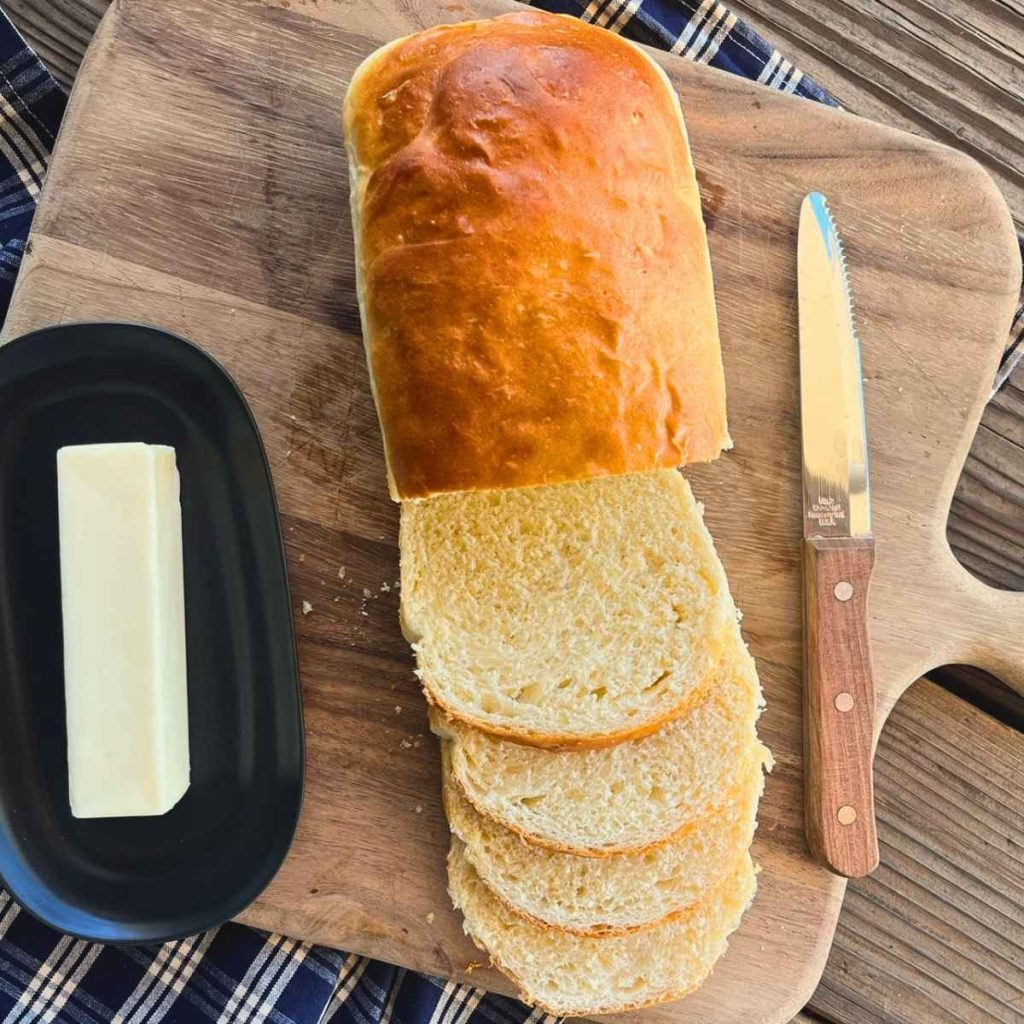
- BAKE – make sure you preheat the oven with the Dutch oven in it.
- COOL & ENJOY!

FAQs:
How much to feed the sourdough starter?
Use 1/2 c sourdough starter, 2/3 c warm water, and 1 c bread flour to feed your sourdough starter. This creates a shaggy, moist starter that creates a strong active starter for all your sourdough recipes. Feel free to double or triple this recipe depending on your need.
How soon after feeding a sourdough starter can I use it?
The sourdough starter is ready to use when it has doubled in size within a few hours of feeding, looks airy with lots of bubbles, and has a pleasant, slightly tangy aroma. At this stage, the yeast is at its peak strength, meaning it can give your dough the lift it needs for a beautifully risen sourdough loaf.
How to store a sourdough starter?
After feeding and using your active starter, you can refrigerate the discard. Store the discard in a glass jar with a lid in the refrigerator any time you are not using it. Take the jar out of fridge when it times to feed the starter.
Other High Altitude Recipes:


If you make this delicious HIGH ALTITUDE SOURDOUGH BREAD recipe please rate this recipe and leave a comment below about how it turned out. I would love to see pictures of your loaf! If you have any questions, post them below and I would love to help you out.
Easy High Altitude Sourdough Bread
Wild Flour Recipes | Baking at 8,000 ft
www.wildflourrecipes.com
Equipment
- large mixing bowl
- Measuring Tools digital scale or measuring cups
- Proofing Container bowl & tea towel or banneton basket
- Dutch Oven
- Sharp Knife knife, scissors, or bread lame
- Parchment paper
- Cover For Proofing Container tea towel or plastic cover
Ingredients
- 100 grams Active Starter 1/2 cup
- 450 grams Warm Water 2 cups
- 550 grams Bread Flour 4 cups
- 12 grams Kosher Salt 2 tsp
Instructions
- MIX STARTER & WATER – combine the starter and warm water together until fully incorporated in a large mixing bowl
- ADD FLOUR & SALT – add the flour and salt to the starter and water. Initially the dough will be very dry and appear like it needs more water. Continue to mix and the dough will become moist and shaggy – sticky and moist uneven lumps. If the dough still appears dry after several minutes of mixing slowly add water 1 tablespoon at a time.
- REST FOR 45 MINUTES – cover the mixing bowl with a damp tea towel or plastic cover and rest at room temperature for 45 minutes
- GRAB & STRETCH X4 – grab and stretch the dough by grabbing the bottom of the dough at 3, 6, 9, and 12 o'clock around the bowl and stretching it to the middle. Then cover the bowl and let rest for 30 minutes between each Grab & Stretch. First Stretch – using a spatula may be easier since the dough hasn't developed gluten and is very sticky. Fourth Stretch (optional) – this last stretch helps to create more gluten and strength to the dough. By the time you reach this stretch you should be able to grab the entire dough, lift up, and fold in half. Then grab the dough on the opposite side so when lifted up it folds in half the opposite way. Repeat this 2 more times.
- REST UNTIL DOUBLE – after the last Grab & Stretch cover the bread dough with a damp tea towel and let rest at room temperature until doubled in size. This have take different amounts of time depending on the temperature in your kitchen.
- SHAPE THE DOUGH & REST – lightly flour your clean countertop and place bread dough on it. Spread the dough out into a square approximately 12"x12". Fold the dough in half and roll up the dough tightly from the short end. Let the dough rest on the counter for 20 minutes.
- PLACE IN BASKET & PINCH – prepare your proofing basket/bowl by lightly flouring the tea towel. Place the dough with smooth side down and seam side up. Pinch the sides of the dough towards the center and press together to create additional tension on the dough in the bottom of the bowl.
- FERMENT IN FRIDGE OVERNIGHT – cover the dough with a damp tea towel or plastic cover and place in the fridge overnight to ferment. NOTE: the dough can be stored in the fridge for up to 72 hours.
- PREHEAT OVEN – place the Dutch oven in the oven and preheat the oven to 475° F. NOTE: keep the bread in the fridge while preheating the oven
- FLOUR & SCORE – place parchment paper on your counter top and flip the dough onto it. Lightly flour the top of the dough and cut 1 long line approx. 1/2" deep across the entire loaf. Feel free to add more decorative cuts in additional to the long cut.
- BAKE – place the parchment paper and dough into the Dutch oven (use caution, the Dutch oven is HOT). Place the lid on the Dutch oven. Bake for 25 minutes then remove the Dutch oven lid and reduce the heat to 450° F. Continue to bake for 20-25 minutes until the loaf is a deep golden brown. NOTE: to prevent the bottom of the bread from burning place a baking sheet on the shelf below the Dutch oven.
- COOL – allow the bread to cool for 1-2 hours before cutting open the loaf. ENJOY!


I’m visiting my daughter who lives in Denver, are there any adjustments I would need to make to this recipe for her elevation which is more like 5400 ft?
You should not have to make any adjustments at that elevation.
I was so nervous to try and make sourdough for the first time but this recipe was so easy to follow and my loaf turned out great. Thank you!
I live at almost exactly 8000 feet and love to bake, so I am happy to have found your page!
This dough was very wet after baking overnight fermentation- I’m wondering if I didn’t bulk ferment long enough? I baked it anyways and turned out great, just not the prettiest. Any tips?
This is a very high hydration dough which makes a very wet dough. My biggest tip is to create a lot of tension when shaping the dough and when pinching the sides of the dough when its in a basket. I always bulk ferment for a minimum of 12 hours. Hope this helps!
I’ve tried this recipe twice and having problems with the rise. I put it in the oven with the oven light on to create a warmer environment. I just end up with a dense loaf. I use an active starter, fed 24 hours before using and at about 5900 feet. Any tips or issues that can be causing this? I’m in my third attempt now! Thanks.
What ratio are you feeding your starter? I typically feed mine 1:2:2 first thing in the morning and then use it in the recipe around 3-5 hours later, depending on how warm my house is and how long it takes to peak.
Ah ok! I try to shorten the time between feeding and using it. Thanks!
Just giving you an update! I’m feeding my starter just how you said and my bread has been turning out perfectly!