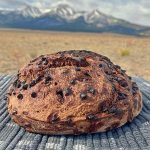
High Altitude Double Chocolate Sourdough Bread
Wild Flour Recipes | Baking at 8,000 ft
www.wildflourrecipes.com
Made with cocoa powder and studded with mini chocolate chips, every slice is soft, deeply chocolatey, and just slightly tangy from the sourdough starter.
Yield: 1 loaf
Calories: 178kcal
Equipment
- large mixing bowl or Electric Stand Mixer
- Digital Scale
- Proofing Container banneton or 9" bowl with tea towel
- Baking sheet
- Sharp Knife or Bread Lame
- Parchment paper
- Cover For Proofing Container damp tea towel, shower cap, or plastic wrap
- Baking Dish or Cast Iron Skillet
Ingredients
- 100 grams Active Sourdough Starter
- 275 grams Water
- 350 grams Bread Flour
- 35 grams Cocoa Powder
- 50 grams Brown Sugar
- 10 grams Kosher Salt
- 150 grams Mini Chocolate Chips
- Rice Flour optional for dusting banneton
Instructions
- FEED STARTER 12 HOURS IN ADVANCE – feed the started 1:5:5 or 10 grams starter:50 grams Bread Flour : 50 grams water.
- MIX STARTER & WATER – mix in a large bowl until the water is creamy without chunks of starter
- ADD FLOUR, BROWN SUGAR, COCOA POWDER, & SALT– initially the dough will be dry just keep mixing. The dough will eventually become wet and shaggy.
- REST FOR 45 MINUTES – cover with a moist towel, plastic wrap, or lid.
- COIL FOLD & REST X 2 – grab the center of the dough and pull up, allowing the edges to fall underneath, repeat another 2-3 times. Rotate the bowl 90 degrees and do 3-4 more coil folds. Cover the dough and rest for 30 minutes then repeat the coil fold, cover, and rest time.Each time you do a set of coil folds the dough will get smoother, stretch without breaking, and get less sticky.TIP: wet your hands to prevent the dough from sticking to your hands
- ADD MINI CHOCOLATE CHIPS – dump the chocolate chips into the bowl on top of the dough. Using your fingers gently press the chocolate chips into the dough.
- COIL FOLD & REST X 2 – grab the center of the dough and pull up, allowing the edges to fall underneath, repeat another 2-3 times. Rotate the bowl 90 degrees and do 3-4 more coil folds. Cover the dough and rest for 30 minutes then repeat the coil fold. TIP: only perform coil folds until the dough become to tight or starts to tear. That is the dough indicating the gluten needs to rest.
- BULK FERMENT – cover the dough and let sit at room temperature. The amount of time needed for this will be different for each kitchen & day. Anticipate 6-10 hours.TIP: Signs of bulk fermenting being done: dough is at least doubled in size, indent stays when pressed with 1 finger, not sticky, bubbles on the surface, the top of the dough is domed, and the dough jiggles like Jell-O.NOTE: taking the temperature of your dough can help determine how long bulk fermentation will take. My dough is typically 72° F and takes around 6 hours. Warmer dough will take less time and colder dough will take longer.
- PRE-SHAPE & REST – dump the bread dough onto a clean work surface. Using a bench scraper or your hands pre-shape the dough. Gently push the edge of the dough in and away from you then rotate pushing the dough in and toward you to create a ball and tension in the dough. Continue this rotating motion until the dough is smooth on top and you create a tight ball. Rest the dough on the counter for 20 minutes.
- SHAPE – lightly flour the banneton basket or tea towel in a bowl with Rice Flour or Bread Flour. In one quick motion scoop up the bread dough with a bench scraper or your hands. Flip the dough over (the smooth surface on the bottom in the palm of your hands) and fold the dough in half. Place the dough smooth side down into the floured basket. Pinch the seam of the dough together creating additional tension to the bottom.
- PLACE IN FRIDGE – cover the dough with a moist tea towel or shower cap. Place it fridge for a minimum of 12 hours or up to 72 hours.NOTE: the longer the bread sits in the fridge the more sour taste the bread will have
- PREHEAT OVEN – preheat the oven to 450° F. Add the empty baking sheet to the oven while preheating.
- PREPARE STEAM – when open baking on a baking sheet steam needs to be added to the oven. Place a 9×13 baking dish (NOT glass) or cast iron skillet to the lowest rack of the oven. Prepare boiling water.
- SCORE – gently dump the dough onto parchment paper. Cut one simple, deep cut across the dough. Add additional cuts if you want to be creative but they are hard to see on the dark crust.
- BAKE - add the dough to the HOT baking sheet by using the parchment paper. Pour the boiling water into the heated 9×13 pan and immediately close the oven door. Bake 20 minutes. Then remove the pan with water and decrease the temperature to 425° F. Bake for 15 minutes.TIP: for even baking rotate the bread 180° after 20 minutes when the water is removed from the oven.
- COOL & ENJOY! – I know its hard but allow the bread to cool completely before cutting into it.
Notes
Suggested Sourdough Timeline:
- 8 PM FEED STARTER – feed the starter 1 : 5 : 5 = 10g Starter : 50g Water : 50g Bread Flour
- 8 AM MIX - mix all ingredients and rest 45 minutes
- 8:45 AM COIL FOLD - coil fold, cover, and rest 30 minutes
- 9:15 AM COIL FOLD - coil fold, cover, and rest 30 minutes
- 9:45 AM COIL FOLD & ADD MINI CHOCOLATE CHIPS - coil fold, cover, and rest 30 minutes
- 10:15 AM COIL FOLD - coil fold, cover, and bulk ferment
- 6-10 HOURS LATER - (time dependent on dough and temperature) pre shape dough, rest 20 minutes, shape, and put into fridge
- 10 AM BAKE
Nutrition
Serving: 1out of 12 slices slices | Calories: 178kcal | Carbohydrates: 31g | Protein: 5g | Fat: 5g | Saturated Fat: 3g | Polyunsaturated Fat: 0.3g | Monounsaturated Fat: 1.2g | Sodium: 328mg | Potassium: 146mg | Fiber: 3g | Sugar: 11g | Vitamin A: 18IU | Calcium: 24mg | Iron: 2mg